If you’re wondering how to make chicken pot pie Pillsbury style, you’re in the right place! Chicken pot pie is the ultimate comfort food a flaky crust hugging a rich, creamy filling packed with tender chicken and colorful veggies. Whether you’re cooking for a cozy family dinner or looking to impress guests, this step-by-step guide will walk you through everything you need to create the perfect Pillsbury pot pie. Let’s get started!
Pillsbury Chicken Pot Pie
What is a Chicken Pot Pie?
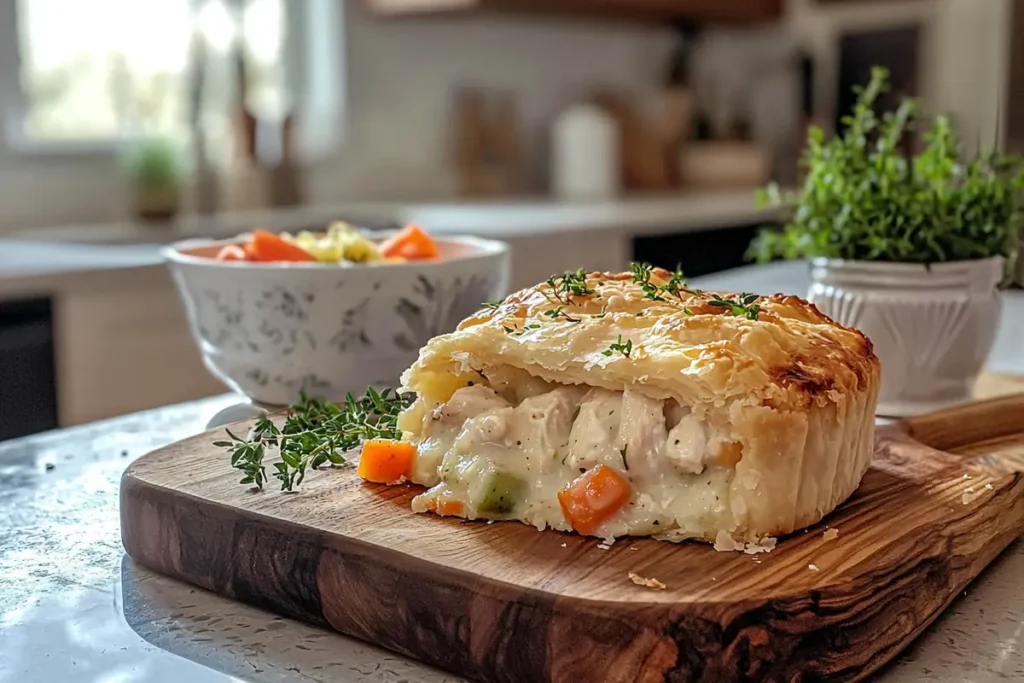
Chicken pot pie is a savory dish traditionally made with cooked chicken, vegetables, and a thick sauce, all enclosed in a flaky pie crust. The combination of a buttery, golden crust and a creamy, savory filling makes it a beloved classic that warms both the heart and stomach.
Why Use Pillsbury Pie Crust?
Pillsbury’s pie crusts are the secret weapon for stress-free cooking. They’re pre-rolled, perfectly flaky, and require minimal prep, making it easier than ever to whip up a delicious pot pie without having to make dough from scratch. Plus, they’re versatile—you can use them for mini pot pies, turnovers, and more!
Quick Overview of the Recipe
To make a delicious Pillsbury chicken pot pie, you’ll need a few simple ingredients: cooked chicken, frozen veggies, chicken broth, and Pillsbury’s refrigerated pie crust. The process involves preparing a rich filling, assembling the pie, and baking it to golden perfection. Whether you’re a seasoned chef or a beginner, you’ll love how simple and satisfying this recipe is.
In the next section, we’ll cover the must-have ingredients to create the perfect homemade chicken pot pie.
Ingredients for Pillsbury Chicken Pot Pie
Essential Ingredients for the Filling
The heart of any homemade chicken pot pie is its filling. Here’s what you’ll need to nail that creamy, flavorful goodness:
- Chicken: Shredded or cubed cooked chicken works best. Rotisserie chicken is a great shortcut if you’re pressed for time.
- Vegetables: A classic blend includes carrots, peas, green beans, and corn. You can use frozen mixed vegetables or dice fresh ones for added texture.
- Creamy Base: The filling gets its signature richness from a combination of chicken broth, milk, or cream, thickened with a bit of flour or cornstarch.
- Butter and Onion: These add an irresistible depth of flavor.
Choosing the Best Vegetables and Chicken Cuts
For a more rustic, hearty flavor, opt for dark meat chicken thighs—they stay moist during cooking. If you prefer a leaner option, chicken breast is your best bet. When it comes to vegetables, you can get creative! Add diced potatoes or mushrooms for a fun twist. The key is balancing texture and color.
Understanding Pillsbury’s Pie Crust Options (Frozen vs. Refrigerated)
Pillsbury offers two popular options:
- Refrigerated Pie Crusts: These come rolled and ready to use. Just unroll, line your pie dish, and you’re good to go!
- Frozen Pie Crusts: These come pre-shaped in pie tins and are convenient if you want to skip rolling altogether.
No matter which you choose, Pillsbury’s crusts deliver a perfectly flaky finish every time.
In the next part, we’ll dive into how to prepare the filling to make your pot pie rich, creamy, and irresistible! Let’s get cooking!
Preparing the Filling
Step 1: Cook the Chicken
Start by cooking your chicken until it’s juicy and tender. If you’re using raw chicken breasts or thighs, boil them in salted water until fully cooked, then shred or cube them into bite-sized pieces. For extra flavor, you can add herbs like bay leaves or thyme to the boiling water. Alternatively, rotisserie chicken is a convenient option that cuts prep time in half!
Step 2: Prepare the Creamy Sauce
To create that rich and velvety filling, melt butter in a saucepan over medium heat. Add diced onions and cook until they’re soft and fragrant. Stir in flour and whisk continuously to form a roux. This helps thicken the sauce without lumps. Gradually pour in chicken broth and milk, whisking until smooth. Add a pinch of salt, black pepper, and a dash of dried thyme or rosemary for extra warmth.
Your creamy sauce should have a thick, gravy-like consistency—thick enough to coat a spoon but not too stiff.
Step 3: Mix Vegetables and Chicken into the Sauce
Once the sauce is thickened, stir in your shredded chicken and vegetables. Frozen peas, carrots, corn, and green beans are the classic mix, but you can throw in some sautéed mushrooms or diced potatoes if you’re feeling adventurous. Let the filling simmer gently for 2-3 minutes to meld the flavors together. If the filling seems too thick, add a splash of broth; if too runny, let it cook for another minute to thicken.
Now you’ve got the heart of your pot pie—creamy, savory, and loaded with delicious chunks of tender chicken. In the next part, we’ll show you how to assemble your Pillsbury chicken pot pie to perfection!
Assembling the Chicken Pot Pie
Step 1: Prepare the Bottom Crust
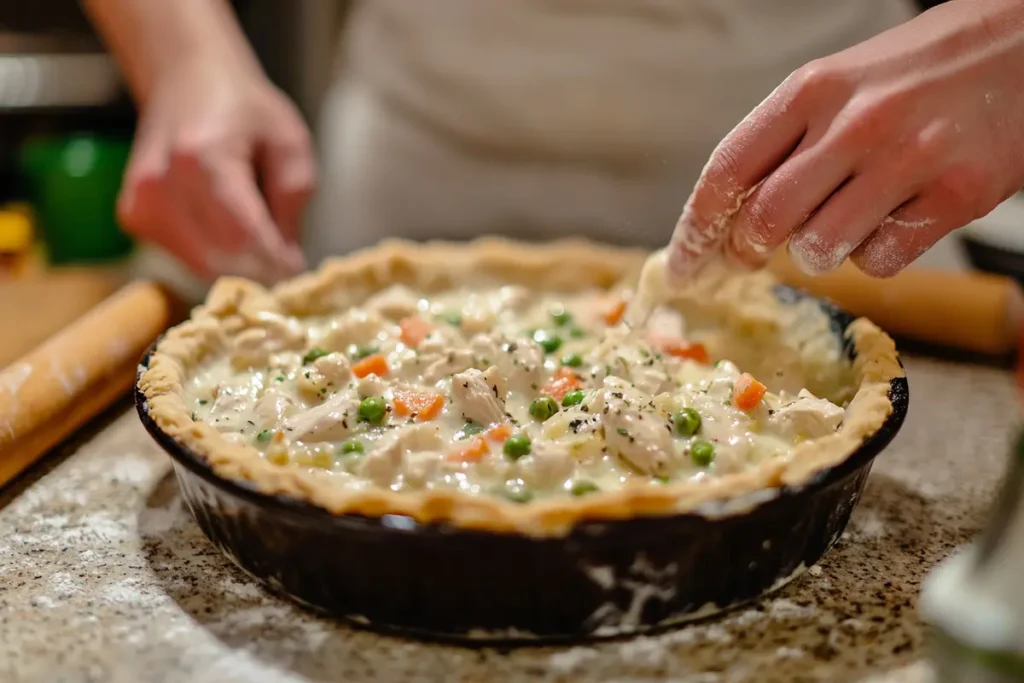
Unroll your Pillsbury refrigerated pie crust and gently press it into the bottom of your pie dish. Make sure the crust covers the edges to hold the filling securely. For an extra flaky crust, brush the base lightly with beaten egg to create a barrier against the filling’s moisture. This simple trick prevents a soggy bottom and keeps the pie crust perfectly crisp.
If you’re using a frozen Pillsbury pie crust, simply thaw it as per the package instructions and it’s ready to go!
Step 2: Add the Filling
Spoon the prepared creamy chicken and vegetable filling into the pie crust. Spread it evenly so that every bite is packed with tender chicken, crisp veggies, and that luscious sauce. The filling should reach just below the rim of the pie dish to prevent spills during baking.
Step 3: Place and Seal the Top Crust
Unroll the second pie crust and gently lay it over the filling. Trim any excess dough hanging over the edges. Use your fingers or a fork to crimp the edges and seal the crust securely. This step ensures the filling stays inside as it bubbles while baking.
To allow steam to escape, cut small slits in the center of the top crust. This prevents the pie from puffing up unevenly and keeps the filling from spilling out.
Tips for Creating a Golden, Crispy Crust
- Egg Wash: For that beautiful golden-brown finish, brush the top crust with a mixture of beaten egg and a splash of milk.
- Flavor Boost: Sprinkle a bit of coarse salt or parmesan cheese on the crust for an extra punch of flavor.
Your pot pie is now prepped and ready to bake! In the next part, we’ll guide you through the baking process for how to make chicken pot pie Pillsbury-style perfection.
Baking the Pot Pie
Preheating and Baking Instructions
Preheat your oven to 425°F (220°C). Place the assembled pot pie on the middle rack to ensure even baking. Bake for 30 to 35 minutes, or until the top crust is golden brown and the filling is bubbling through the steam slits.
To prevent the edges of the crust from browning too quickly, you can cover them with foil or use a pie crust shield for the first 20 minutes of baking.
How to Check for Doneness
Your pot pie is done when:
- The crust is golden and firm to the touch.
- You see the creamy filling bubbling gently through the slits.
- The bottom crust feels crispy when you tap the bottom of the pie dish.
Allow the pot pie to cool for 5-10 minutes before serving to let the filling set. This prevents it from spilling out when you slice into it.
Common Baking Mistakes to Avoid
- Undercooked Crust: If the bottom crust still looks pale after baking, place the pie on a lower oven rack for an additional 5 minutes.
- Overbaked Filling: If the top crust browns too quickly, reduce the oven temperature slightly and cover the pie loosely with foil.
For more delicious dinner ideas, check out Buffalo Chicken Stuffed Peppers for a flavorful twist on chicken dishes!
Variations and Creative Twists
Mini Chicken Pot Pies with Pillsbury Biscuit Dough
If you’re hosting a casual gathering or want to serve individual portions, mini chicken pot pies are the way to go! Instead of pie crusts, use Pillsbury biscuit dough to create fluffy, golden pot pie “caps.”
Here’s how:
- Grease a muffin tin and press biscuit dough into each cup.
- Fill each cup with your creamy chicken and vegetable filling.
- Top with another layer of dough or leave it open-faced for a fun presentation.
Bake at 375°F (190°C) for 12-15 minutes or until the biscuits are golden. These are perfect as appetizers or lunchbox treats!
Slow Cooker Chicken Pot Pie
For a “set it and forget it” approach, you can make your filling in a slow cooker! Add your chicken, vegetables, broth, and seasonings, then let it cook on low for 6-8 hours or high for 3-4 hours. Once the filling is ready, transfer it to an oven-safe dish, top it with Pillsbury pie crust, and bake until the crust is crispy and golden.
Gluten-Free and Health-Conscious Versions
If you’re looking for a gluten-free twist, Pillsbury offers gluten-free dough alternatives, or you can swap in homemade almond flour crusts. For a lighter filling, use unsweetened almond milk instead of cream and add more vegetables like zucchini and mushrooms for added nutrients.
These twists show just how versatile how to make chicken pot pie Pillsbury style can be. Whether you’re in the mood for bite-sized pies or healthier options, there’s a version for everyone!
Serving and Storage Tips
Serving Suggestions
Serve your chicken pot pie with a fresh green salad or roasted Brussels sprouts for a balanced meal. The creamy filling pairs beautifully with crisp, tangy sides.

For an extra cozy touch, sprinkle fresh parsley or thyme on top before serving. The pop of green not only adds flavor but also makes the dish look more inviting.
How to Store Leftover Pot Pie
If you have leftovers (though it’s rare!), you can store the pot pie in an airtight container in the fridge for up to 3 days. Make sure the pie has completely cooled before storing to avoid sogginess.
Reheating Tips for Maximum Freshness
To reheat, pop the pot pie in the oven at 350°F (175°C) for 10-15 minutes until warmed through. Avoid microwaving if possible, as it can make the crust chewy instead of crispy.
For a make-ahead option, you can freeze unbaked pot pies. Simply assemble, wrap tightly in foil, and freeze for up to 3 months. When you’re ready to bake, no need to thaw—just add a few extra minutes to the baking time!
Troubleshooting Common Issues
What to Do If the Crust Sinks or Burns
A common issue when learning how to make chicken pot pie Pillsbury-style is a crust that sinks into the filling or burns before the pie is done. To avoid this:
- For sinking crusts: Make sure the filling isn’t too runny. If your sauce feels watery, let it simmer a bit longer until it thickens.
- For burnt crust edges: Use a pie shield or cover the edges with foil during the first 20-25 minutes of baking. Remove it for the final 10 minutes to brown the crust evenly.
How to Prevent a Watery Filling
No one likes a pot pie that spills everywhere! If your filling is too soupy, here are some quick fixes:
- Use the right ratio of flour or cornstarch when making the roux—about 2 tablespoons per cup of liquid.
- Let the filling cool slightly before adding it to the crust. This prevents the heat from breaking down the crust too quickly.
- Add a bit of shredded cheese to the filling for extra thickness and richness.
Saving a Cracked Pie Crust
If your crust cracks, don’t panic! Patch small cracks with a bit of leftover dough or a brush of egg wash. For larger cracks, use decorative pie crust cut-outs to cover the gaps—it’ll look intentional and impressive!
Frequently Asked Questions (FAQs)
1. Can I use leftover turkey instead of chicken?
Absolutely! If you have leftover holiday turkey, it works wonderfully in this recipe. The same process applies—just shred the turkey and mix it into the creamy filling.
2. How long can chicken pot pie be stored in the refrigerator?
Once cooled, store your chicken pot pie in an airtight container in the fridge for up to 3 days. For longer storage, freeze it for up to 3 months.
3. Can I freeze an uncooked chicken pot pie?
Yes! Assemble the pie as usual, wrap it tightly in foil, and place it in the freezer. When you’re ready to bake, no need to thaw—just bake straight from frozen and extend the cooking time by 10-15 minutes.
4. Why is my pot pie filling too runny?
A runny filling usually means the sauce wasn’t thickened enough during preparation. Be sure to whisk your roux thoroughly and let it simmer until it reaches a gravy-like consistency before assembling.
For more helpful tips on hearty meals, check out our guide to Million Dollar Chicken Casserole.